반응형
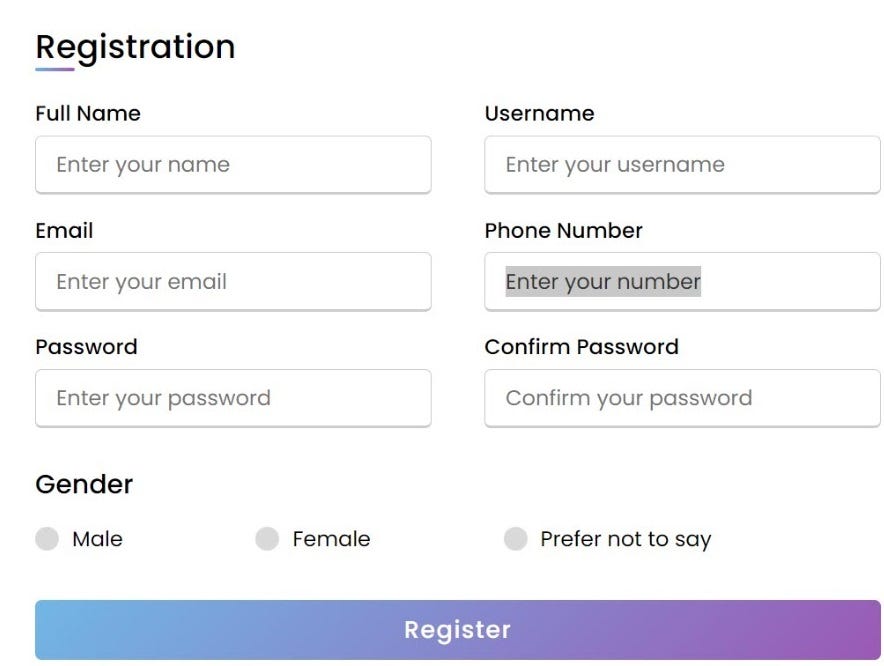
여러분 안녕하세요! 여러분 모두 잘 지내시길 바랍니다. 오늘은 HTML과 CSS만을 사용하여 응답형 등록 양식을 만든 방법을 시연하겠습니다. 제가 만든 이 등록 양식은 HTML과 CSS를 사용하여 가장 아름답게 구성되고 디자인된 웹페이지입니다.

초보자로서 HTML과 CSS가 뭔지 아시겠죠? 아니! 그것들은 엄밀히 말하면 프로그래밍 언어가 아니야. 그들은 구조와 설계를 웹 개발로 만드는데 사용된다.
그럼 HTML과 CSS를 사용하여 응답형 등록 양식을 만드는 것부터 시작하겠습니다.
소스 코드: (HTML)
<!DOCTYPE html>
  <html lang="en" dir="ltr">
      <head>
        <meta charset="UTF-8">
              <!---<title> Responsive Registration Form | CodingLab </title>--->
              <link rel="stylesheet" href="style.css">
                     <meta name="viewport" content="width=device-width, initial-scale=1.0">
                            <title>Registration Form</title>
   </head>
<body>
                                <div class="container">
                                      <div class="title">Registration</div>
    <div class="content">
            <form action="#">
                      <div class="user-details">
                                  <div class="input-box">
                                                <span class="details">Full Name</span>
            <input type="text" placeholder="Enter your name" required>
                        </div>
          <div class="input-box">
                        <span class="details">Username</span>
            <input type="text" placeholder="Enter your username" required>
                        </div>
          <div class="input-box">
                        <span class="details">Email</span>
            <input type="text" placeholder="Enter your email" required>
                        </div>
          <div class="input-box">
                        <span class="details">Phone Number</span>
            <input type="text" placeholder="Enter your number" required>
                        </div>
          <div class="input-box">
                        <span class="details">Password</span>
            <input type="text" placeholder="Enter your password" required>
                        </div>
          <div class="input-box">
                        <span class="details">Confirm Password</span>
            <input type="text" placeholder="Confirm your password" required>
                        </div>
        </div>
        <div class="gender-details">
                    <input type="radio" name="gender" id="dot-1">
                                <input type="radio" name="gender" id="dot-2">
                                            <input type="radio" name="gender" id="dot-3">
                                                        <span class="gender-title">Gender</span>
          <div class="category">
                        <label for="dot-1">
                                      <span class="dot one"></span>
            <span class="gender">Male</span>
          </label>
          <label for="dot-2">
                        <span class="dot two"></span>
            <span class="gender">Female</span>
          </label>
          <label for="dot-3">
                        <span class="dot three"></span>
            <span class="gender">Prefer not to say</span>
            </label>
          </div>
        </div>
        <div class="button">
                    <input type="submit" value="Register">
                              </div>
      </form>
    </div>
  </div>
</body>
</html>
웹페이지의 HTML 구조 작성은 CSS를 통해 웹페이지의 디자인 부분에서 작업해야 합니다.
소스 코드: (CSS)
@import url('https://fonts.googleapis.com/css2?family=Poppins:wght@200;300;400;500;600;700&display=swap');
*{
    margin: 0;
    padding: 0;
    box-sizing: border-box;
    font-family: 'Poppins',sans-serif;
}
body{
    height: 100vh;
    display: flex;
    justify-content: center;
    align-items: center;
    padding: 10px;
    background: linear-gradient(135deg, #71b7e6, #9b59b6);
}
.container{
    max-width: 700px;
    width: 100%;
      background-color: #fff;
    padding: 25px 30px;
    border-radius: 5px;
    box-shadow: 0 5px 10px rgba(0,0,0,0.15);
}
.container .title{
    font-size: 25px;
    font-weight: 500;
    position: relative;
}
.container .title::before{
    content: "";
    position: absolute;
    left: 0;
    bottom: 0;
    height: 3px;
    width: 30px;
    border-radius: 5px;
    background: linear-gradient(135deg, #71b7e6, #9b59b6);
}
.content form .user-details{
    display: flex;
    flex-wrap: wrap;
    justify-content: space-between;
    margin: 20px 0 12px 0;
}
form .user-details .input-box{
    margin-bottom: 15px;
    width: calc(100% / 2 - 20px);
                }
                form .input-box span.details{
                  display: block;
                  font-weight: 500;
                  margin-bottom: 5px;
                }
.user-details .input-box input{
    height: 45px;
    width: 100%;
      outline: none;
    font-size: 16px;
    border-radius: 5px;
    padding-left: 15px;
    border: 1px solid #ccc;
    border-bottom-width: 2px;
    transition: all 0.3s ease;
}
.user-details .input-box input:focus,
  .user-details .input-box input:valid{
      border-color: #9b59b6;
  }
 form .gender-details .gender-title{
     font-size: 20px;
     font-weight: 500;
 }
 form .category{
      display: flex;
      width: 80%;
         margin: 14px 0 ;
      justify-content: space-between;
 }
 form .category label{
      display: flex;
      align-items: center;
      cursor: pointer;
 }
 form .category label .dot{
     height: 18px;
     width: 18px;
     border-radius: 50%;
       margin-right: 10px;
     background: #d9d9d9;
     border: 5px solid transparent;
     transition: all 0.3s ease;
 }
 #dot-1:checked ~ .category label .one,
    #dot-2:checked ~ .category label .two,
       #dot-3:checked ~ .category label .three{
            background: #9b59b6;
            border-color: #d9d9d9;
       }
 form input[type="radio"]{
      display: none;
 }
 form .button{
      height: 45px;
      margin: 35px 0
 }
 form .button input{
      height: 100%;
         width: 100%;
            border-radius: 5px;
      border: none;
      color: #fff;
      font-size: 18px;
      font-weight: 500;
      letter-spacing: 1px;
      cursor: pointer;
      transition: all 0.3s ease;
      background: linear-gradient(135deg, #71b7e6, #9b59b6);
 }
 form .button input:hover{
     /* transform: scale(0.99); */
     background: linear-gradient(-135deg, #71b7e6, #9b59b6);
 }
 @media(max-width: 584px){
    .container{
        max-width: 100%;
    }
   form .user-details .input-box{
         margin-bottom: 15px;
         width: 100%;
   }
     form .category{
           width: 100%;
     }
     .content form .user-details{
           max-height: 300px;
           overflow-y: scroll;
     }
     .user-details::-webkit-scrollbar{
           width: 5px;
     }
 }
  @media(max-width: 459px){
      .container .content .category{
            flex-direction: column;
      }
  }
다음 코드의 출력:

자, HTML과 CSS를 이용한 등록 양식 작성에 관한 기사였습니다.
동일한 비디오 튜토리얼을 시청하고 싶으시다면, 아래는 링크된 비디오 또는 임베디드 비디오입니다. 반드시 그것을 살펴보고 등록 양식에 대한 당신의 경험을 설명해야 합니다.
(특정한 성취나 위치에 따르는) 영광
'css' 카테고리의 다른 글
| #100DaysOfCode 중 Day27 (0) | 2022.03.07 |
|---|---|
| 각 목록 항목 스타일을 사용자 정의하는 CSS 트릭 (0) | 2022.03.07 |
| 웹에 사이드바 레이아웃을 작성하는 방법 및 작성하지 않는 방법 (0) | 2022.03.07 |
| 새로운 페이지 오브젝트를 등록하기 전에 자신을 확인합니다. (0) | 2022.03.07 |
| CSS: 체계적이고 이해하기 쉬운 상태로 유지 (0) | 2022.03.06 |
댓글